2D to 3D Conversion — A Complete Overview
2D to 3D Conversion — A Complete Overview
Introduction
Many basins around the world contain decades of legacy 2D seismic lines. While valuable, 2D data has limitations: sparse coverage, inconsistent vintages, and limited spatial continuity. Converting 2D datasets into a 3D seismic volume unlocks new interpretive power, enabling geoscientists to visualize the subsurface with greater clarity.
This article explains the 2D → 3D conversion workflow, why it matters, and how it supports exploration and reservoir characterization.
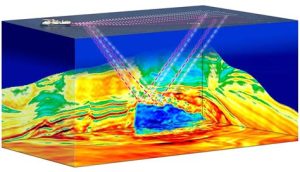
1. What Is 2D → 3D Conversion?
2D → 3D conversion is the process of transforming multiple intersecting 2D seismic lines into a coherent 3D seismic volume. It involves:
Harmonizing geometry
Interpolating missing data
Balancing amplitudes
Gridding the dataset
Assembling a 3D cube
The result is a continuous volume that supports structural and stratigraphic interpretation.
2. Why 2D → 3D Conversion Matters
Many operators rely on legacy 2D data because:
3D acquisition is expensive
Historical surveys cover large areas
Exploration teams need regional context
Converting 2D to 3D provides:
✔ Better structural continuity
Faults and horizons become easier to track.
✔ Improved attribute analysis
Attributes require consistent 3D volumes.
✔ Enhanced prospect evaluation
3D visualization reduces uncertainty.
✔ Cost‑effective subsurface imaging
No need for new acquisition.
3. The 2D → 3D Conversion Workflow
Stage 1: Data Audit
The process begins with a full audit of:
2D lines
Navigation files
Metadata
Vintages
Processing history
Key output: Data inventory & QC report.
Stage 2: Geometry Harmonization
Different 2D lines often use different coordinate systems, datums, or navigation formats. Harmonization ensures:
Consistent coordinate reference systems
Correct line intersections
Unified geometry
Key output: Unified geometry model.
Stage 3: Interpolation
Interpolation fills gaps between lines using:
2D interpolation
3D interpolation
5D regularization
Key output: Dense, regularized grid.
Stage 4: Amplitude Balancing
Amplitude variations between lines can distort interpretation. Balancing ensures:
Consistent energy levels
Smooth transitions
Reliable attribute extraction
Key output: Balanced amplitude field.
Stage 5: Gridding & Volume Assembly
This is where the 3D cube takes shape. The harmonized, interpolated data is gridded into a 3D volume.
Key output: Initial 3D seismic volume.
Stage 6: Smoothing & Conditioning
Filters are applied to:
Improve continuity
Reduce artifacts
Enhance reflector clarity
Key output: Cleaned 3D cube.
Stage 7: QC Review
QC ensures:
Structural continuity
Amplitude consistency
Geometry accuracy
Key output: QC maps & validation report.
Stage 8: Final Deliverables
The final package includes:
3D SEGY volume
Metadata
QC documentation
Key output: 3D SEGY, metadata, QC package.
Conclusion
2D → 3D conversion transforms legacy seismic lines into a powerful 3D imaging tool. It enhances interpretation, reduces uncertainty, and provides a cost‑effective alternative to new acquisition. For many operators, it unlocks the full value of decades of seismic investment.